Thursday, March 28, 2013

House Tour 1.5

Some of the details I love:


(The ceilings are great).


(The leaded glass windows and doors).

`


(The "prayer room."  The original owner went to the Orient, back when it was called the Orient and brought back all the materials to make this room.  It is where Roxy spends her days when we're at work and we love to curl up and read.)

Up soon, the second floor!


Monday, March 25, 2013

House Tour Part 1

As we approach our two month anniversary of owning the house I figured it was time for a tour.  At this point we are unpacked and semi-decorated but we haven't tackled any big projects yet.  So these pictures will also serve as a "before" which we'll update you as we redecorate and/or remodel.

The downstairs is part 1.  The living room:


The dining room:


We are in agreement that the dark green/gold color scheme needs to go.  We are currently picking out paint colors.


The entry way (Foyer?)


Notice the Paws Staircase.  It is not quite complete, I will post about it when it is.

The library:


And the kitchen:


The kitchen is the only room I consider "done" (defined as I don't plan to make drastic changes to it in the short term).  The rest we'll add to (maybe only by updating the furniture and/or art) so expect to see "after" pictures. 

Thursday, March 21, 2013

Cheap v. Thrifty: Homemade Cleaning Supplies

I have a theory that all the pre-made cleaning solutions out there are a scam.  I'm talking about the soft scrubs, the greenworks, the you-name-it multipurpose cleaner.  I used to use these all the time and then I decided awhile back to try baking soda and vinegar.  I find that baking soda, vinegar and some elbow grease clean 90% of what I need to clean, and cleans it well.  For the other 10%?  Good old fashioned (and also dirt cheap) bleach does the job.

(Notice the "NOT" Soft Scrub bottle.  I just reuse a bottle from back when I bought such things).

No need for a separate plastic bottle of cleaner for the kitchen, the bathroom, the windows (skip the baking soda and just use vinegar on windows and glass).  It makes life simpler and much less costly.

Here is a recently cleaned with baking soda and vinegar stove top:


If you look at that picture and say it is still dirty, then I assure you it is user error (or standards) because that is how it looks after I clean regardless of what I used.

A quick tip for microwave cleaning (I told my mom to do this when I was visiting her last time and she was surprised how well it worked).  Spray down the whole microwave with vinegar.  Wet down a paper towel or microfiber cloth.  Microwave on high for two minutes and wipe clean.  Easy!  Before and after shots:


(We use these microfiber cloths in lieu of dish sponges and just throw them in the washing machine regularly. Between washes I often microwave them on high for a couple of minutes to kill anything that might be growing.)

My exception to the non-commercial cleaning products is wood cleaner.  For some reason we have a boatload of pledge and other wood cleaning products so I use them.  I think they are from Kevin's first house (he sold that 5 years ago) since I haven't bought any in years.  Once those are used up (we have a lot more wood in our house now so it will be pretty soon) I'll look into making a wood-safe home cleaner.  In fact, a quick Google search led me to this recipe: a quarter cup of olive oil, four tablespoons of distilled white vinegar, and two teaspoons lemon juice in a spray bottle.  I have all of those ingredients already.  Once I use up the wood polish in a spray bottle, this is what will be replacing it.


Monday, March 18, 2013

Best Buds

Who says dogs and cats can't be friends?  Kinsey and Pippa love each other.


Trust me, it's love.

Thursday, March 14, 2013

Repurposing Frames

I've already told you how much I love Goodwill for clothes shopping.  Well since buying the house I've discovered another reason to love that treasure trove: cheap picture frames!

On my last trip to the charity store, I scoured the frames section and came up with half a dozen frames for an average of $4 each.  I did buy a couple of new in the box solid wood frames for $6 each which threw off the average.  Most of them were in the $2-$3 range.

I cleaned them up with WD-40 and vinegar.  Kevin taught me that WD-40 is great to get stickers and other stuck things off glass and windows.

Some of the frames were framed art (vs. picture frames) and had sealed cardboard or paper on the back.  That is okay, just use a knife and a flat head screwdriver to peel it off.


Usually there are staples holding the art in; use the screwdriver to bend them back.


Pop the old art out and your picture in.   (The back will look a bit unfinished without the cardboard but once on the wall no one will see it.):


Voila!  A framed picture for a song.  I blurred out my niece's face to comply with my no faces rule, you'll have to take my word for it that she is adorable.


Monday, March 11, 2013

Basement Find: Accordion Shutters

As part of our contract for our new house we asked the previous owners to leave everything original to the house.  We had the accordion shutters and other woodwork we spotted in the basement in mind when we asked.  They also left a bunch of paint/primer/etc they used on the house.  Some of the cans are helpfully marked with which room they used it in, but the majority are not.  I've already put some of the paint and primer to use (detailed in a blog post coming up).  They left a lot of random stuff too. We spent last Sunday morning exploring down there.  From the dusty corners we pulled out a great old door, a wood frame that would make a great mirror, and some other random things.  We also found a cool brass tension lamp but Kevin broke it as we were getting it out to get a better look.  I'm usually the Breaker of Things in our family so I didn't mind a bit.

Here are the shutters we pulled out (post clean up - they were pretty dirty to start):


Here are some already installed (what they will eventually look like):


I cleaned the shutters and Kevin did the hard part of figuring out which shutters went together and where.


I'm not sure why these were ever taken down or why modern houses don't have these. They are great - you can pull just the bottom half - giving us privacy from the street but still letting light in. When not in use they fold into the wall.  It also postpones our need for window treatments (we can wait until our budget bounces back a bit).

Thursday, March 7, 2013

June in a Jar

Last summer was the first time I tried canning.


I thought I went a little crazy with all the jam (we're generally not big jam eaters) but we are down to our last bit of maple strawberry syrup (recipe from Ball's Book of Complete Home Preserving).


I'm pretty sad because it has been like June in a jar all winter.

At least it is March, spring and summer is in sight!

Monday, March 4, 2013

Homemade Pantry: Making Yogurt

We eat a lot of yogurt.  Awhile back we switched to buying the quart sized rather than the individual plastic cups.  We reuse the containers a lot.  So much that sometimes we reach into the fridge for the yogurt and come out with chicken broth or roasted tomatoes.

So after reading this blog post I was tempted to try making some ourselves.

I started out heating up the milk to 180 degrees.  I think this is to kill off any bad bacteria before you grow all the good bacteria.


The instructions called for letting it cool down to 115 degrees.  I figured I had some time so I walked the dogs, threw in a load of laundry, and mixed up some corn bread muffins and got them baking.

Once the thermometer reached 115 I mixed in the starter yogurt the instructions called for (three tablespoons of plain yogurt with live cultures in it) and filled up my mason jars.  NOTE: the results were uneven, some jars were pure yogurt and others were more like drinkable yogurt.  In my next batch I added more starter yogurt (half a pint's worth) and whipped it around the pot with my immersion blender for even distribution.  This worked much better.


I filled up a Styrofoam cooler with 115 degree water and loaded them in.


I wrapped the cooler with two towels and left it alone (the second time, the first time I kept opening it up and checking to see if it was still warm/anything was happening - this may have contributed to the runny result).  I checked it once after four hours and it was down to 109 degrees.  I added some scalding water to bring the temp up a bit (mixing it around quickly so as to not to kill the bacteria we were trying to grow).

I checked it after 8 hours and it was like magic!  What was once milk is now yogurt:


I immediately saved some for the next batch (hid it in the back of the fridge).  One more step for Greek yogurt though.  I lined a colander with cheese cloth and put it over a pyrex measuring cup.  I stuck it in the fridge over night.  In the morning there was Greek yogurt left in the colander and whey in the pyrex (I put three quarts of regular yogurt and got about 1.5 quarts for a 50% loss rate). I saved the whey for treats for the paws (they all love it).

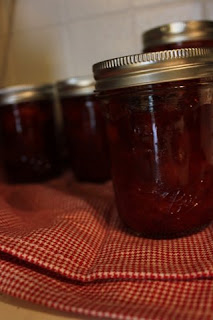
We've been sweetening it with strawberry syrup I canned last summer, honey or maple syrup.  I can see lots of variety coming our way: honey, maple, strawberry, blueberry, even mulberry.  The possibilities are limited only by our dwindling supply of home canned preserves.